Project: Into the Storm

Description: An Oculus VR experience that immerses you in the midst of a lake, where you find yourself in a boat facing the imminent threat of a massive, almost supernatural tornado headed your way.

Software Used: Maya and Photoshop

In this project, I utilized Maya for 3D modeling and Photoshop for texturing to create a realistic and immersive environment that heightens the tension and excitement of the approaching storm.


Project: Violet Hubris

Description: A cosmic action-horror game that explores humanity’s relentless quest for knowledge, power, and belonging in a harsh and unforgiving universe.

Storyline:
Play as Violet Hubris, a trans woman and scientist, accompanied by her AI assistant, CLAIR. Violet’s ambition leads her to open an interdimensional door into an otherworldly prison. As she delves deeper into the prison, she must battle eldritch abominations and uncover dark secrets.

Software Used: Maya and Substance Painter

In this project, I used Maya for detailed 3D modeling and Substance Painter for creating realistic and immersive textures, enhancing the eerie and unsettling atmosphere of the game.


Project: Spectrum

Studio: HexCode Studios

Description: An innovative puzzle-platformer game where players explore an open space environment, absorbing colours to solve platform-based puzzles. Utilize the powers of red, blue, and green to your advantage, absorbing these colours into your weapon to help navigate and interact with the environment.

Software Used: Maya and Substance Painter

For this project, I used Maya for 3D modeling and Substance Painter for texturing, creating vibrant and dynamic visuals that enhance the unique gameplay mechanics of colour absorption and manipulation.


Project: Sexy Slug 

Description: This project focused on a comprehensive character modeling study, specifically a slug character. The study included modeling, creating blendshapes, rigging, and animation, as part of the first phase of a character workshop in class. A key challenge was testing the limits of creating a wink with one eye.

Software Used: Maya and After Effects

In this project, Maya was used for modeling, blendshapes, rigging, and animation, while After Effects was utilized for refining and presenting the animations.

Project: Elfa

Description: This study initially focused on the comprehensive creation of a humanoid character, covering aspects such as modeling, topology, texturing, blendshapes, rigging, animation, and some gameplay elements. As the project progressed, the focus shifted to lighting and post-processing to enhance the visual quality. The original concept was drawn in Photoshop, with subsequent stages completed in Maya.

Software Used: Maya, Photoshop, Unity, Nuke, and After Effects

For this project, I used:

  • Photoshop for concept art
  • Maya for modeling, topology, texturing, blendshapes, rigging, and animation
  • Unity for integrating and testing the character in a gameplay environment
  • Nuke and After Effects for lighting adjustments and post-processing, ensuring a polished final presentation

Project: Liminal VR Internship

Description: During my internship at Liminal VR, I worked on the Corrupted Boss character modeled by Daniel Butcher. My responsibilities included texturing, refining topology, rigging, and animation.

Roles: Lead Animator, Character Artist, and Environment Artist

Software Used: Maya, Photoshop, Unity, and After Effects

In this project, I utilized:

  • Maya for topology adjustments, rigging, and animation
  • Photoshop for texturing the Corrupted Boss
  • Unity for integrating the characters and animations into the VR environment
  • After Effects for finalizing and presenting the animations

Project: Capstone Project – Animated Short Film

Description: This project focused on creating an animated short film based on an original synopsis I wrote, while also learning and incorporating new software into the production process.

Roles: Director, Producer, Animator, Compositor, and Character Artist

Software Used:

  • Polycam for 3D scanning and modeling
  • Blender for additional modeling and animation
  • Metahuman Creator for creating realistic human characters
  • Unreal Engine 5 for rendering and real-time animation
  • Marvelous Designer for creating detailed clothing and fabric simulations
  • Maya for character modeling, rigging, and animation
  • Mixamo for quick character rigging and animation
  • After Effects for compositing and final editing

This project allowed me to combine my skills in storytelling, animation, and character design with new tools and techniques, resulting in a polished and engaging animated short film.

Project: 007

Description: This group project focused on creating clean topology, texturing, blendshapes, rigging, and animation. The concept art was created by Malvika Gopinath, while I handled all other aspects of the project.

Roles: Producer, Character Artist, and Post-Processor

Software Used:

  • Maya for topology, blendshapes, rigging, and animation
  • Substance Painter for texturing
  • After Effects for post-processing and final touches

In this project, I managed the production process, crafted the character art, and performed post-processing to ensure a polished final product.

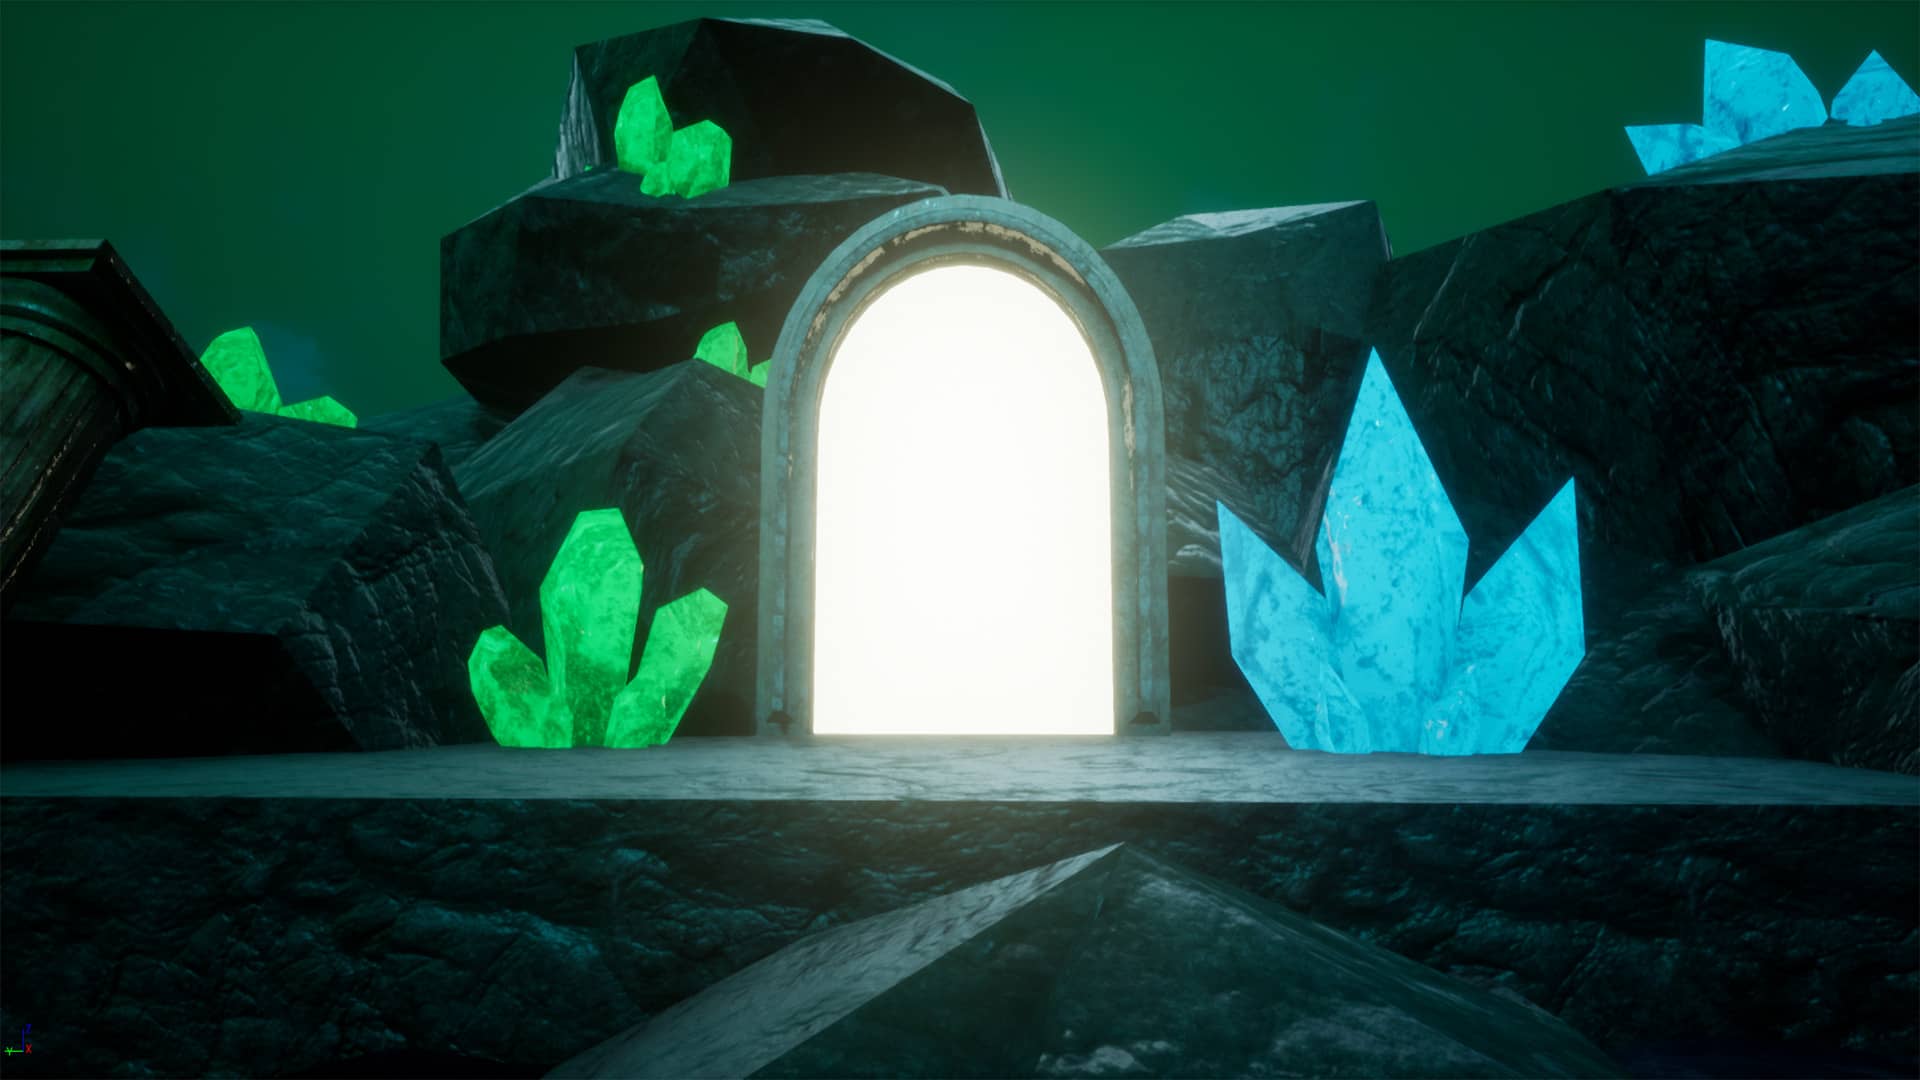
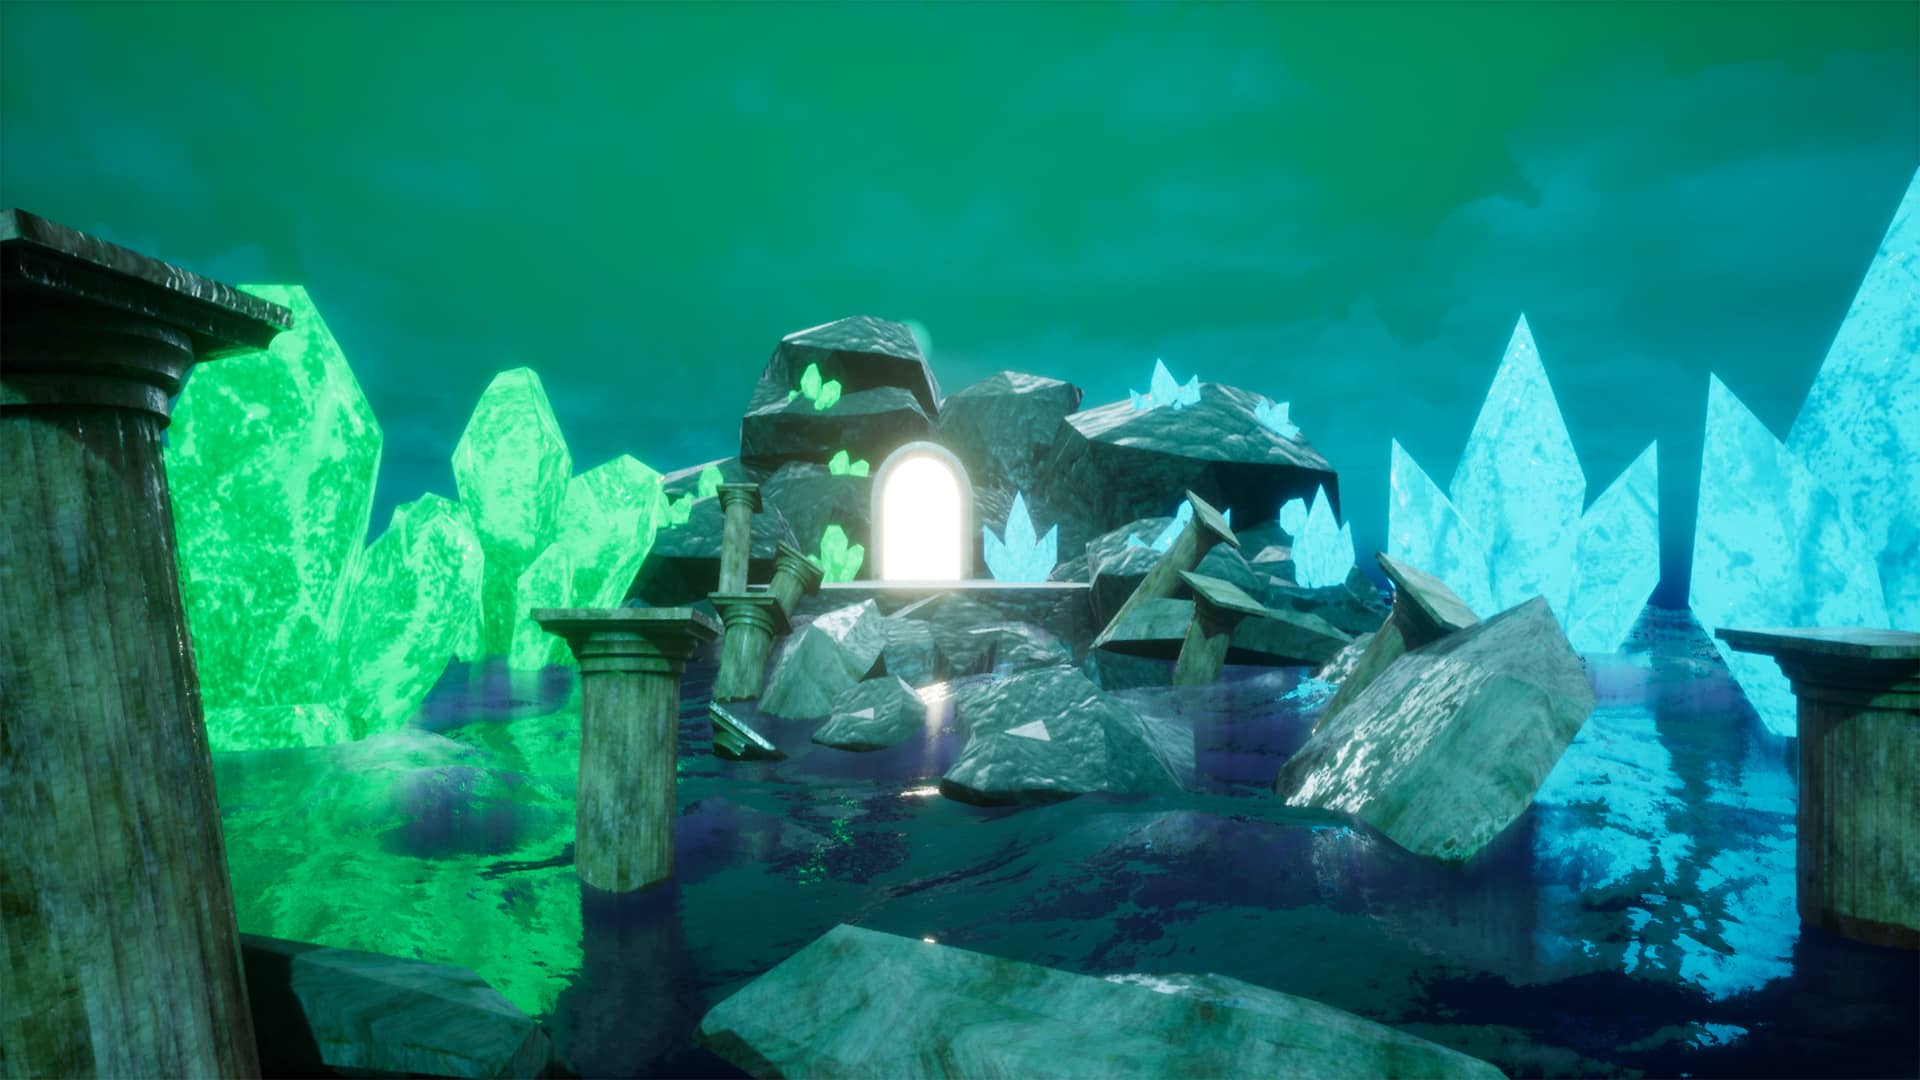
Project: Celestial Doorway

Description: This bootcamp study focused on learning and mastering Unreal Engine 4. I created every asset in Maya and imported them into Unreal Engine 4. The sky and water simulations were performed within the engine.

Software Used:

  • Maya for asset creation
  • Photoshop for texture creation
  • Substance Painter for advanced texturing
  • Unreal Engine 4 for environment building, sky, and water simulations
  • After Effects for post-processing and final adjustments

This project allowed me to gain hands-on experience with Unreal Engine 4, enhancing my skills in creating and integrating assets, and performing real-time simulations.


About Me

Greetings! I’m a dedicated 3D Artist and I’m thrilled to share my journey with you. With three years of hands-on industry experience, I’ve honed my skills and carved out my own unique niche in the realm of 3D modeling.

My journey into the world of 3D modeling was inspired by my deep passion for video games. Playing games wasn’t just a pastime for me; it was a gateway to learning valuable life skills. Through countless hours of gaming, I discovered the importance of strategic planning and the art of teamwork. Video games taught me that true success often hinges on collaborative efforts, and I’ve embraced this lesson in my professional life.

My ultimate dream is to contribute my expertise to an animation or game studio. I aspire to be at the forefront of crafting model assets and characters that captivate audiences and immerse them in incredible virtual worlds. With each project, I aim to push the boundaries of creativity, technical excellence, and innovation, all while staying true to my passion for video games that started this incredible journey.

Thank you for visiting my “About Me” page. If you’d like to collaborate or discuss any exciting opportunities, please don’t hesitate to get in touch. Let’s bring imagination to life, one 3D model at a time.

Want to get in touch? Leave your details down below!

Slug character modeling study. Focused on modeling, blendshapes, rigging and animation. Part 1 of character workshop in class. Tested the limits of trying to wink with one eye.

Software used: Maya and After Effects

Humanoid character model study. The focus initially was on modeling, topology, texturing, blendshapes, rigging, animation and a little gameplay. Later down the track the new focus was on lighting and post-processing. The original concept was drawn in Photoshop and everything else in Maya.

Software used: Maya, Photoshop, Unity, Nuke and After Effects

Liminal VR internship project. Daniel Butcher modelled Corrupted Boss. My focus was on texturing, topology, rigging and animation.

Roles included: Lead Animator, Character Artist and Environment Artist

Software used: Maya, Photoshop, Unity and After Effects

Capstone Project: Animated Short Film. The focus of this piece was to create an animated short film based on an original synopsis I wrote and to learn new software.

Roles included: Director, Producer, Animator, Compositor and Character Artist

Software used: Polycam, Blender, Metahuman Creator, Unreal Engine 5, Marvelous Designer, Maya, Mixamo and After Effects


Group project Study focused on creating clean topology, texturing, blendshapes, rigging and animation. Concept art was by Malvika Gopinath, everything else was done by me.

Roles included: Producer, Character Artist, and post-processer

Software used: Maya, Substance Painter and After Effects

Bootcamp study. The focus was to play and learn Unreal Engine 4. Produced every asset Maya and imported it into Unreal Engine 4. Sky and water simulations were done in the engine.

Software used: Maya, Photoshop, Substance Painter, Unreal Engine 4 and After Effects.

About Me

Greetings! I’m a dedicated 3D Artist and I’m thrilled to share my journey with you. With three years of hands-on industry experience, I’ve honed my skills and carved out my own unique niche in the realm of 3D modeling.

My journey into the world of 3D modeling was inspired by my deep passion for video games. Playing games wasn’t just a pastime for me; it was a gateway to learning valuable life skills. Through countless hours of gaming, I discovered the importance of strategic planning and the art of teamwork. Video games taught me that true success often hinges on collaborative efforts, and I’ve embraced this lesson in my professional life.

My ultimate dream is to contribute my expertise to an animation or game studio. I aspire to be at the forefront of crafting model assets and characters that captivate audiences and immerse them in incredible virtual worlds. With each project, I aim to push the boundaries of creativity, technical excellence, and innovation, all while staying true to my passion for video games that started this incredible journey.

Thank you for visiting my “About Me” page. If you’d like to collaborate or discuss any exciting opportunities, please don’t hesitate to get in touch. Let’s bring imagination to life, one 3D model at a time.

Want to get in touch? Leave your details down below!

Accessibility tools

Powered by - Wemake

Here is the sketch reference provided by the project manager. The concept involves creating rocks with glowing cracks, emphasizing a vibrant and dynamic appearance.

Here, I have modeled a few samples of rocks intended for the calm world, adhering to the project manager's specifications to limit each rock to a minimum of 40 and a maximum of 200 polygons.

After my meeting with the project manager, I received a screenshot indicating which rocks passed the review and can move on to the next stage. The rocks that are circled have been approved, while those crossed off will not be used.


Moving onto the next stage after UV unwrapping the rocks, I need to texture them. This was my first time creating a normal and emissive map as a whole. However, after receiving some feedback, I realized that the normal bump map was facing outward instead of inward, and the cracks were not glowing.

Due to my inexperience in resolving these issues, I sought advice from my lecturer.


Based on the feedback from the project manager and my lecturer, I learned how to adjust the normal map to make the cracks appear inward instead of outward. I also discovered how to create an emissive map to make the cracks glow. This was achieved by using the blur tool in Photoshop, which helps create the illusion of a glowing effect.

Additionally, I decided to make the cracks on the emissive map white. This allows the game designers to easily change the colour of the cracks to any shade they prefer when importing the assets into Unity.


I tested the rock textures and assets by importing them into Unity and applying the textures. The ability to change the colour of the cracks on the rocks was successful. After receiving additional feedback from the game designers and project manager, I made the glow of the cracks softer and the texture lighter. This can be seen in the smaller shot in front.


Here is the fully rendered version of the rocks I modeled and textured for the game.

Here is how my rocks look with the cracks glowing. The game design team and project manager decided to change the colours of the cracks to blue, pink, purple, and orange. Overall, I had a great experience with my first collaboration at Liquid Punch. I learned how to create normal and emissive maps, which was an invaluable addition to my skill set.


  • Modelled in Maya
  • Used a cube and added subdivisions to it
  • Used the bend tool to bend the cube
  • The extrusion and bevel tool was used to create the doorway bend
  • Added plane in the back
  • Edited plan to fit the size of the door so glow would not exceed the doorframe
  • Rocks modelled for a different project
  • Decided to reuse it for the Celestial Doorway project
  • Rocks modelled with a minimum polycount of 40 to a maximum of 200

Modelled in  Industrial Smasher Maya

Started with a cube, and added subdivisions and extrusions to make the base 

Added a few more cubes with subdivisions and stacked them on top to create a section the pipe can enter from

Used the bend and subdivide tool to bend to change the cube into a pipe

Image 1: First iteration of industrial smasher

Image 2: After some feedback, I scaled up the stack as requested and removed the extra pieces on the side of the industrial smasher

Image 3: From the final feedback I used the bend tool to make the piper curvier and re-added the extra pieces on the bottom side of the industrial smasher

Image 4: The final version of the industrial smasher  all cleaned up

Modelled in Maya

Used multiple cubes and scaled them down to become a scaffold wall

Created the legs of the scaffold  by adding  subdivisions and extrusions at the bottom of the feet

Once the first scaffold had been modelled. I duplicated it multiple times to create alternative modular scaffolds that could connect to each other

  • Modelled in Maya
  • Used a cube and added subdivisions to it
  • Used the bend tool to bend the cube
  • The extrusion and bevel tool was used to create the doorway bend
  • Added plane in the back
  • Edited plan to fit the size of the door so glow would not exceed the doorframe

In Game Shots

Your content goes here. Edit or remove this text inline or in the module Content settings. You can also style every aspect of this content in the module Design settings and even apply custom CSS to this text in the module Advanced settings.

Your content goes here. Edit or remove this text inline or in the module Content settings. You can also style every aspect of this content in the module Design settings and even apply custom CSS to this text in the module Advanced settings.

Your content goes here. Edit or remove this text inline or in the module Content settings. You can also style every aspect of this content in the module Design settings and even apply custom CSS to this text in the module Advanced settings.

Your content goes here. Edit or remove this text inline or in the module Content settings. You can also style every aspect of this content in the module Design settings and even apply custom CSS to this text in the module Advanced settings.

Your content goes here. Edit or remove this text inline or in the module Content settings. You can also style every aspect of this content in the module Design settings and even apply custom CSS to this text in the module Advanced settings.

Your content goes here. Edit or remove this text inline or in the module Content settings. You can also style every aspect of this content in the module Design settings and even apply custom CSS to this text in the module Advanced settings.

Your content goes here. Edit or remove this text inline or in the module Content settings. You can also style every aspect of this content in the module Design settings and even apply custom CSS to this text in the module Advanced settings.

Your content goes here. Edit or remove this text inline or in the module Content settings. You can also style every aspect of this content in the module Design settings and even apply custom CSS to this text in the module Advanced settings.

Your content goes here. Edit or remove this text inline or in the module Content settings. You can also style every aspect of this content in the module Design settings and even apply custom CSS to this text in the module Advanced settings.

Your content goes here. Edit or remove this text inline or in the module Content settings. You can also style every aspect of this content in the module Design settings and even apply custom CSS to this text in the module Advanced settings.

Your content goes here. Edit or remove this text inline or in the module Content settings. You can also style every aspect of this content in the module Design settings and even apply custom CSS to this text in the module Advanced settings.

Your content goes here. Edit or remove this text inline or in the module Content settings. You can also style every aspect of this content in the module Design settings and even apply custom CSS to this text in the module Advanced settings.

Your content goes here. Edit or remove this text inline or in the module Content settings. You can also style every aspect of this content in the module Design settings and even apply custom CSS to this text in the module Advanced settings.

Your content goes here. Edit or remove this text inline or in the module Content settings. You can also style every aspect of this content in the module Design settings and even apply custom CSS to this text in the module Advanced settings.

Your content goes here. Edit or remove this text inline or in the module Content settings. You can also style every aspect of this content in the module Design settings and even apply custom CSS to this text in the module Advanced settings.

Your content goes here. Edit or remove this text inline or in the module Content settings. You can also style every aspect of this content in the module Design settings and even apply custom CSS to this text in the module Advanced settings.

  • Modelled in Maya
  • Used a cube and added subdivisions to it
  • Used the bend tool to bend the cube
  • The extrusion and bevel tool was used to create the doorway bend
  • Added plane in the back
  • Edited plan to fit the size of the door so glow would not exceed the doorframe
  • Modelled different variations of pillars
  • Struggled to choose between a traditional and a modernised pillar
  • Receive feedback and decide to go with the traditional pillar
  • Rocks modelled for a different project
  • Decided to reuse it for the Celestial Doorway project
  • Rocks modelled with a minimum polycount of 40 to a maximum of 200
  • Attempted to model crystals following YouTube tutorials
  • Wasn't getting the outcome I wanted
  • Got feedback from the lecturer and discovered a new tool called boolean subtract
  • Used the boolean subtract tool tp cut sections of the object to create either a sharper or blunter state
  • Duplicated the best crystals multiple times and grouped them
  • Added a plane underneath the crystal groups to give it some surface
  • Once I was happy with all my assets I exported them out of Maya and imported them into Unreal Engine 4
  • I added the crystals, rocks, doorways and pillars
  • I was learning how to add as well as use textures and materials
  • The object I worked my hardest on was the crystals to illuminate

Here are the render tests and outcomes of the developing Celestial Doorway in Unreal Engine 4.

Modelled: Pillars, crystals, rocks and doorway

This displays the videos leading to the final Celestial Doorway animation.

Video 1: The camera is still and the animation that can be seen is the waves and sky moving drastically.

Video 2: This was the final rendered animation where the camera slowly pans forward and upward.

Updated Video: Added audio. Adjusted animation to audio and redid the lighting. Changed the ending of the animation where the camera enters the doorway and gets engulfed by the light. As if being transferred to a new world.

Your content goes here. Edit or remove this text inline or in the module Content settings. You can also style every aspect of this content in the module Design settings and even apply custom CSS to this text in the module Advanced settings.

Your content goes here. Edit or remove this text inline or in the module Content settings. You can also style every aspect of this content in the module Design settings and even apply custom CSS to this text in the module Advanced settings.

Your content goes here. Edit or remove this text inline or in the module Content settings. You can also style every aspect of this content in the module Design settings and even apply custom CSS to this text in the module Advanced settings.

Your content goes here. Edit or remove this text inline or in the module Content settings. You can also style every aspect of this content in the module Design settings and even apply custom CSS to this text in the module Advanced settings.

Your content goes here. Edit or remove this text inline or in the module Content settings. You can also style every aspect of this content in the module Design settings and even apply custom CSS to this text in the module Advanced settings.

Your content goes here. Edit or remove this text inline or in the module Content settings. You can also style every aspect of this content in the module Design settings and even apply custom CSS to this text in the module Advanced settings.

Your content goes here. Edit or remove this text inline or in the module Content settings. You can also style every aspect of this content in the module Design settings and even apply custom CSS to this text in the module Advanced settings.

Your content goes here. Edit or remove this text inline or in the module Content settings. You can also style every aspect of this content in the module Design settings and even apply custom CSS to this text in the module Advanced settings.

Your content goes here. Edit or remove this text inline or in the module Content settings. You can also style every aspect of this content in the module Design settings and even apply custom CSS to this text in the module Advanced settings.

Your content goes here. Edit or remove this text inline or in the module Content settings. You can also style every aspect of this content in the module Design settings and even apply custom CSS to this text in the module Advanced settings.

Your content goes here. Edit or remove this text inline or in the module Content settings. You can also style every aspect of this content in the module Design settings and even apply custom CSS to this text in the module Advanced settings.

Your content goes here. Edit or remove this text inline or in the module Content settings. You can also style every aspect of this content in the module Design settings and even apply custom CSS to this text in the module Advanced settings.

Your content goes here. Edit or remove this text inline or in the module Content settings. You can also style every aspect of this content in the module Design settings and even apply custom CSS to this text in the module Advanced settings.

Your content goes here. Edit or remove this text inline or in the module Content settings. You can also style every aspect of this content in the module Design settings and even apply custom CSS to this text in the module Advanced settings.

Your content goes here. Edit or remove this text inline or in the module Content settings. You can also style every aspect of this content in the module Design settings and even apply custom CSS to this text in the module Advanced settings.

Your content goes here. Edit or remove this text inline or in the module Content settings. You can also style every aspect of this content in the module Design settings and even apply custom CSS to this text in the module Advanced settings.

  • Modelled in Maya
  • Used a cube and added subdivisions to it
  • Used the bend tool to bend the cube
  • The extrusion and bevel tool was used to create the doorway bend
  • Added plane in the back
  • Edited plan to fit the size of the door so glow would not exceed the doorframe
  • Modelled different variations of pillars
  • Struggled to choose between a traditional and a modernised pillar
  • Receive feedback and decide to go with the traditional pillar
  • Rocks modelled for a different project
  • Decided to reuse it for the Celestial Doorway project
  • Rocks modelled with a minimum polycount of 40 to a maximum of 200
  • Attempted to model crystals following YouTube tutorials
  • Wasn't getting the outcome I wanted
  • Got feedback from the lecturer and discovered a new tool called boolean subtract
  • Used the boolean subtract tool tp cut sections of the object to create either a sharper or blunter state
  • Duplicated the best crystals multiple times and grouped them
  • Added a plane underneath the crystal groups to give it some surface
  • Once I was happy with all my assets I exported them out of Maya and imported them into Unreal Engine 4
  • I added the crystals, rocks, doorways and pillars
  • I was learning how to add as well as use textures and materials
  • The object I worked my hardest on was the crystals to illuminate

Here are the render tests and outcomes of the developing Celestial Doorway in Unreal Engine 4.

Modelled: Pillars, crystals, rocks and doorway

This displays the videos leading to the final Celestial Doorway animation.

Video 1: The camera is still and the animation that can be seen is the waves and sky moving drastically.

Video 2: This was the final rendered animation where the camera slowly pans forward and upward.

Updated Video: Added audio. Adjusted animation to audio and redid the lighting. Changed the ending of the animation where the camera enters the doorway and gets engulfed by the light. As if being transferred to a new world.